12/29/2018

Gnoming like there's no tomorrow

I usually knit clothes. You know, knits with a clear purpose that get lots of use. I've crocheted a couple toys but generally, I don't knit toys or decorative items. But it seems that when I do, I go for it whole-heartedly.


How: Circular needles 3.5 and 3.75 mm
From: Scrap yarns, 118 g

A year ago, I participated in the Indie Design Gift-A-long for the first time and everyone was crazy about these gnomes. I didn't really care for them myself. Who needs a knitted gnome?


But you know how it goes. You look at something long enough and it starts to make sense. Actually, this new even prettier gnome design had me waiting for Christmas eagerly as this time I intended to hop on the gnome train.

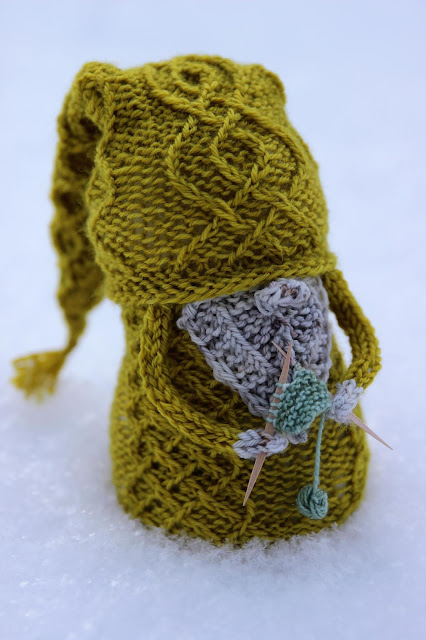
I started out with a traditional red gnome. I found a lovely rustic alpaca blend in red and oatmeal color in my leftover yarn stash. For such a small knit there was an awful lot of knitting to be done. It starts off with the cap and once that's finished, you pick up stitches below the brim to work the body. Finally, you knit a beard in the contrast color and i-cords for the hands. These are both sewn into place.


The gnome isn't very big but both the cap and body have cables all over them which meant I had to stare at the work and the charts constantly. That's what made it feel like a handful.

However, the project was every bit worth of the trouble. The finished gnome is so cute I can't even. It didn't look like anything before the beard but once that is sewn on the gnome wakes up instantly. I had a hard time letting go of the first gnome but I did end up gifting it to my dad.


The second gnome felt a lot easier and the third one flew off the needles in two days and felt like a breeze already. I still have plenty of scrap yarns so I think there might be a lot more gnomes next Christmas.


The gnomes were filled with polyester. It was also suggested to use some pellets to help the gnome from falling. For the first gnome, I didn't have the energy go searching for polyester pellets at a hobby store so that one is a bit too light and tends to fall. For the other two, I realized I could use something we already have at home and filled an old sock with rice. That seemed to work very well.


In my childhood, one of the most magical moments every Christmas was the getting out all the Christmas decorations. My mom's great uncle had made her some wooden elves each with their own personalities and activites. Some were holding notes for Christmas carols, others were skiing etc. And my grandma had an even bigger collection of those elves. It was such great fun going through the elves and seeing what each of them was doing. I wanted to relive my childhood and needed to come up with some different activities for our gnomes as well.


I had seen more than one cute knitting gnome in the Gift-A-long group on Ravelry so that was a no brainer. It would have been easy to knit a little scarf beginning with my 2.0 mm needles and then just slip the stitches onto toothpicks. But I'm not in the habit of letting myself easy so I actually knitted this little garter stitch piece with the toothpicks and I wouldn't recommend that to anyone. The toothpicks stuck to the yarn and were a pain in many other ways as well. But hey, my gnome has an authentic knit in his hands!


I had to come up with something else for the second gnome. Our local newspaper had just the right size columns so I made him his own newspaper with a report from the police. He looks like a detective or a spy himself, don't you think?

12/20/2018

Crooked stripes


What: Slanted stripes Andrea Rangell
How: Circular needle 5.0 mm
From: Handspun Pigeonroof Studios BFL/Silk + Triskelion Elmet, 46+ 29 g

For some reason, in the Gift-A-long shawls and other neck things have been separated into two categories. So, in order to tame the octopus I needed knit a shawl and a cowl.

I dove straight into the deep end and fell in love with this huge stranded colorwork thing that some might also call a cowl. After a while I came to my senses and realized that I needed a whole lot quicker project in order to tame the octopus that is the eight categories of the GAL. Luckily, I happened to run into this simple little cowl by the same designer. Though, I will definitely want to make the colorwork thing one day!


This cowl is designed for two yarns: a neutral solid gray and lovely, lively green-blue yarn. The colorful yarn is something I was drooling over at the Spincycle yarns booth at Edinburgh Yarn Fest last spring. It's super pretty. The yarn is made to have colors behave as if it was handspun. It was also quite expensive so I didn't buy it - though I really really wanted to. Luckily I happen to spin myself so I did have the real thing in my stash.

I had a couple of options but in the end I chose this lovely BFL/silk mix from Pigeonroof Studios with the colors running from yeallow to brown and orange. I paired it up with wonderfully woolly Triskelion Elmet in a color that reminds me of wheat fields.


The cowl was every bit as relaxing as I hoped. It's worked in the round with decreases at one end and increases at the other which made the stripes slanted. Also, the width of the stripes kept changing. That's it. I only wish I would've picked smaller needles as this turned out a bit too loose.

12/13/2018

Caravan tote

This little knitter has been succumbed by sewing frenzy. It seems that to balance work and free time I need another hobby besides knitting as knitting has become party a job. But since I'm a certified masochist knitter, I don't tend to do free time the easiest way. So I've gone and got addicted to sewing bags.


What: Caravan tote / Noodlehead
How: Sewing machine, Brother PS 53
From: Main fabrics are canvas from Spoonflower and wool, lining is cotton and cotton linen mix, a zipper, leather, metal parts, interface etc.

It all started with this weekend bag. It was such a mindblowing sewing experience that I had to make another one for my mom. Then this fall, I spotted a great backpack on Instagram and made one for myself - and in the process seemed to get half of the Finnish knit scene to make them as well. And since then, I've made three more. But those are Christmas presents so you'll have to wait to see the pics. I also bought another back pattern from the same designer, this Caravan tote which is a tote bag designed especially for knitters.


The annoying thing about sewing is that the prepartions take more time than the actual sewing. I spent half a day cutting the fabrics and ironing interface into place. And then I finally sat infront of my sewing machine ready to start... expect that I needed to change the needle and while taking the old one off I managed to drop it deep inside the machine. So much for sewing. Luckily this has now been fixed, as you can probably tell by the pics with the bag.


Caravan tote is a bag designed for knitters. It has one snap pocket on the outside and one pocket on the inside with eyelets so you can pull your yarn through them. But the coolest thing of all is a zipper pocket hidden on the outside of the bag with a needle pocket inside it. There's also plenty of room for printed patterns and notions.


The bag is huge and can easily accommodate a couple projects. The bag is otherwise oopen but it has a magnetic lock in the middle. I bought such powerful magnetic locks that the hardest part about fastening them was to separate the pieces to begin with. For the handles I used leather I found at a craft fair. There were plenty of leather shops selling excess bits from shoe industry.


The caravan tote was a nice sewing project. There weren't any particularly difficult parts and the result is adorable - not to mention handy! The most difficult part of the project was choosing the fabrics. I was hoping to use left over cottons from my stash but it turned out that especially the zipper pocket needed quite a bit of fabric. This is not a project for the smallest pieces of left over fabrics but I did manage to whip this up with my fabric stash. I only bought the metal parts, the leather and interface. Oh yes, the second most annoying thing about sewing is that you always run out of interface.


The pattern also included instructions for this cutest little project bag to match the tote bag. It is so sweet and just the perfect size for a sock project. It didn't quite fit two skeins but who could blame me for trying.

12/08/2018

At the spin mill

Recently, there have been some news stories in the Finnish media about Finnish wool not being appreciated. Tukuwool also made their own press release about this. And I'm glad they did as in my knitting circles, Finnish wool is very much loved.


This week, I had the amazing opportunity to visit Pirtin kehräämö, the spin mill spinning Tukuwool. It was my first time at an industrial spin mill and I thought you might like to see some pics as well.


The tour started off with washing the wool. The bigger quantities are sent to England for washing but small batches are washed at the mill. After rolling in the washing machine, the wool is lifted onto a grate to dry.


The dry wool is fed into a huge machine used for mixing wool and other fibres. It makes the wool all fluffy and blows it into a wool cupboard. I got to take a peek inside and I wish they would've left me stay there to take a nap! I also got see for the very first time how nylon looks as a separate fiber. Int the picture below there's black and white nylon.


From the cupboard, the wool is taken to a drum carder which makes it into fluffy batts, separates it into thin strands and adds just a little bit of twist.


Then it's off to the spinning machine which adds more twist and stretches the fibers depending n how thin yarn they're aiming for. The spin mill was founded in 1948 and it still has one working drum carder and spinning machine from that year. Back then technology was built to last.


Below, there are pictures of worsted wool yarn in the making. There are two different types of wool and yarn: dense and smooth worsted wool where all the fibers have been combed to run in the same direction, and airier, fluffier - and yes, a bit pricklier - woollen wool where the fibers run in all sorts of directions. The spin mill had a separate spinning machine for woollen spun yarn and it was so thin you couldn't really see it with your bare eyes when the machine was running.


Next, the plies go through a plying machine to make 2-ply yarn, like Tukuwool Fingering. Lucky me, I got to feel single ply Tukuwool waiting for its turn in the plying machine.


Last but not least, an industrial skeining machine and washing the yarns.


The spin mill also has a lovely shop. I was gifted some worsted wool to try with my own spinning wheel. I also got a few skeins of their thin worsted yarn because I promised to design a shawl pattern for it in the spring. Thank you so much for the wool and the yarn, and especially for the tour at the mill.


My favorite souvenier off all was a 2 kg lamb I bought!


To be precise, I bought almost 2 kg of woollen carded wool because I've been dreaming for years of  spinning a sweater quantity. Running out of wool shouldn't stop me now!

12/02/2018

Taming the octopus

Sounds strange? Not at all, once you'll let me explane.


What: Thunderstorm toque Abbye Knits
How: Circular needles 3.5 ja 4.5 mm
From: KVG Woolworks Merino DK, 81 g

I'm taking part in the annual Indie design gift-along hosted on Ravelry. It includes a huge bunch of independent knit and crochet designers having a 25 % sale for a week and then everyone joining in for gift knitting.


The event has 8 different categories, each with their own KAL thread. And if you manage to complete a project in each of the eight categories, you've tamed the octopus. I haven't participated in Tour de Sock for a few years now and I miss the competition. So here I am, chasing an octopus.


The spirit of the Indie design gift-along is for the designers to promote each other instead of everyone promoting themselves. So I'm hoping to knit these 8 projects by 8 different designers.


My first project was a super cool hat that I've wanted to knit for a long time. It has a folded rib, showy cables with bobbles in between. But the show stopper is the star shaped crown. I modified the pattern to have a long tail tubular cast on. Just to make the cast on edge nice and round.


I finished the hat in almost one night and it turned out just perfect. The plan was to knit Christmas gifts but what am I to do if the hat fits me so well.


And the yarn. It is the softest thing ever! It's a treasured left over yarn from my stash. I've made a shawl in this yarn some years ago so I'll have to keep the beanie for myself. They make such a cute set!